
Mobile Editing
- Kikky

- Jan 7, 2021
- 6 min read
Good day guyss!! In this blog i'm gonna show a mobile editing technique i puzzled together. You don't have to follow this tutorial every step of the way but i do hope you'll be able to pick up some ideas from it.
For this tutorial i will be using completely free apps so everyone can follow along. Without further adue...
Things you need:
- Imvu (duh.. was just funny to write down xD)
- Eraser app (i use this one)
- Picsart app
- Background image
Table of contents:
1. Taking the picture
- Using a Photoroom
- Using Triggers
2. Background removal
- What app
- Removing
- Editing out outlines
3. Editing
- Basic tips
- Find a background
- Edit background
- Use draw tool for layer control
- Final adjustments tips
My most important message:
Try to edit as LESS as possible.
1] Taking the picture
When you're modeling an interesting theme you're gonna have to take a screenshot in the shop after you made your outfit so you wont have to buy all the items. That's the basic way of mobile modeling. But i want to talk about another way.
Using a photo room
I have this photoroom open for all my friends:
A photoroom is basically a room with no shadows, many poses and you have control over the background. Because this room is new i haven't added many poses yet. But if you see any poses (or furniture) which you would love to have in this room just send me a DM!
The only con is that you need to own your clothes.
The pro's are that you can control the background for easier editing and you can create duet images.
So i've entered this room, and if you go to your chat > smiley > triggers > photoroom you will be able to change the background color, turn grid on/off, or turn the color preview on/off. Pick a color that contrasts from your avi (not the same color as your clothes) Now just pose, and take a screenshot!


2] Removing the background
To remove the background i use this app
IOS: Superimpose
I know there are other background eraser apps out there, but this one i've used since forever and it hasn't let me down. I won't give a full guide about how to use this app, i'll just show you some steps which should work on any background eraser app you use.
First crop the image as much as possible. Then with the eraser tool you have this option called "target area" this will remove most the background in 1 tap because it's all the same color. Keep tapping the spots that still have some background showing till all of it is gone.


You might notice a little outline stay around your avi. Extremely annoying.. i know. But do NOT use feather to get rid of it!! Feather will blur and remove a but of the outline of your avi. Yes it will get rid of the line but because your edges are now softened and blurry it makes the quality of your avi look very low. So keep those sharp edges!! We will work the line away in a different way.
When you export the image make sure you are exporting it as a PNG file and not JPEG. PNG will keep its transparancy. A JPEG will add a white background to it. And if your app gives you a resolution (size) option, pick the biggest size.
Fixing the outline
To get rid of the line we will use Picsart. The reason i use picsart is because picsart lets you edit something with a transparant background, and exports it the way it is aswell. Which most editing apps can't do. (I believe picsart is the only free app that does) Load in your cut-out and with the fx blur tool we will blur it till you dont see the line anymore. Press submit. Now we add the same avi image on top, make sure they are alligned perfectly. Before you press submit we will use the mask tool (eraser) and carefully remove the white outline. Don't remove too much or the blur will show on your avi. If you accidentally blurred too much you can use the paintbrush to recover the image back.


When you're done press submit. You can see if you want to use any other adjustments on the avi, maybe sharpening it a little bit or editing out some glitches but i'm keeping it as it is because we will adjust the entire edit later too and you want to use as least adjustments as possible when editing.
3] Editing
Now for the actual editing. I prefer using 1 app to do everything because exporting and importing to switch apps is a pain. It also risks losing quality because many apps export in smaller sizes. I suggest to always use a 1x1 ratio (square) canvas so your edit wont have to be cropped when we post it on our social media. So always try to use a 1x1 ratio.
Background
When you're getting a background image, make sure its a good quality image. At least 1000 pixels big. Don't get anything less than 1000 pixels.. A tip to get highres images from google is when you're in google image search, go to >tools > size > large

I start by opening my image to picsart and cropping it into a square. Now i place my avi on top of it but i DONT apply it. I want to see how it looks on my background so i can tweak until my avi actually fits in the scene. Delete your avi and edit the background till you're happy. (remember, a few slight adjustments can go a long way, don't go overboard. you want it to look natural.)
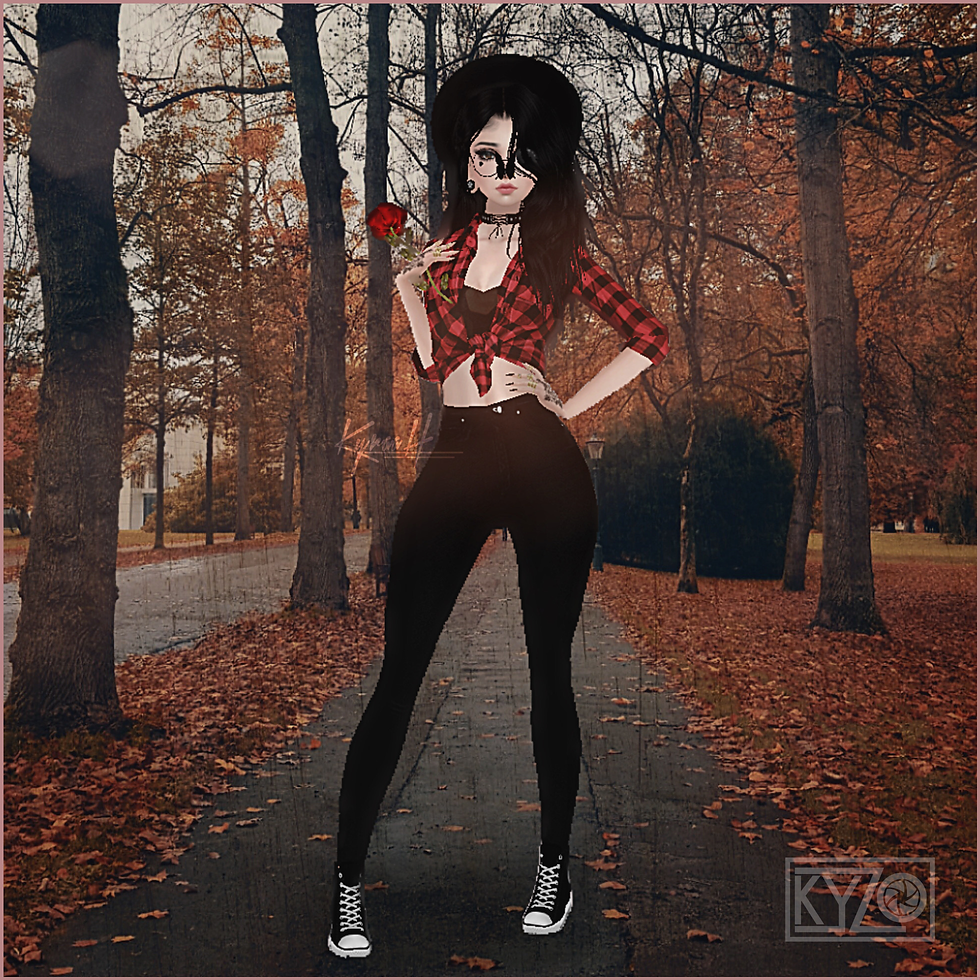
In my case i had to make the orange leaves a bit more red to fit with the shirt, and i made the background a little bit darker. You can add blur if you wish, many times I do but for this edit i kept it sharp.


Use draw for layers
now we will really place the avi. But to do this we will open up the draw panel. Why? Because the draw panel supports layering in PicsArt. You can open up layers by tapping on the blue highlighted 3 rectangles in the example image below.
upload your avi picture and place it where you want.
Add a new layer
Place new layer below avi layer
Use the brush tool to add shadows on the floor for your avi (if you see the floor in your edit
you can add more layers on top of your avi and with different colors and blending modes you can create shading, contours and highlights on your image.
when you’re all done and happy press the 3 dots menu and continue editing your image.


Adjustments & final touches
To finish it all off we will add the last few adjustments to make your image look like 1 aesthetic scene. If you adjusted the background enough before then you wont need to do much now. Usually i just sharpen it a little more so it looks like a higher quality. Go to FX and pick HDR.

I wont tell you the exact adjustments because every edit is different, but i can explain it a bit
The blur is the sharpning ratio and it must be low.. very low. Not 0 ofcourse because else the sharpening wont have any affect but If its too high it will make these black sharp lines it just gets ugly.. i noticed that no matter what app i use i always have my ratio at 2.. so i guess 2 is my best sharpening ratio.
The unsharp is where you can go crazy. I suggest zooming in on your image to really see how it fixes up the lines and details. I have this pretty high, usual above 60. Fade will help make it a little smoother.
After this i can edit the adjustments again. Most of the time i already edited everything to fit the aesthetic troughout the process so i wouldn have to make more final adjustment. But when i do then here are my personal tips of what i use and how.
Saturation: This will make the colors look brighter. I like keeping my edits soft aesthetic rather than bright colors, especially if the colors don’t match together. So many times i slightly lower the saturation Instead of increasing it.
Brightness and Contrast / Highlights and Shadows: Use it carefully. You want there to be a contrast so show debth in the image, but you dont want it to be too high. I guess the best tip is to make sure that you can see all the details In both the light areas as the dark ones. highlights and shadows will give you more control over the light and dark in the image while brightness and contrast adjusts the overall image.
Other than these adjustments i dont use anything else because i don’t want to go overboard.
And now i have a final end result using only free apps on my phone :)
Please like the blog if this was somewhat helpful to you. It motivates me to make more tutorials 😂 let me know if there’s anything you’d like me to talk about in the next blog. Byebyee ❤️

Comments